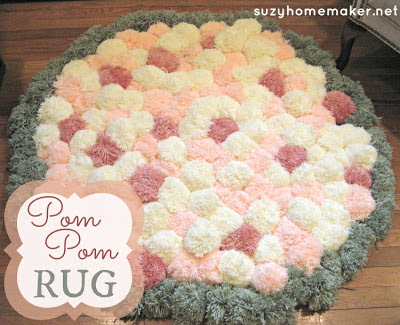
This pom pom rug is the perfect spot to slow down, be present and enjoy simple living.
Over the last several years I have grown to love and embrace simple living and appreciating the present. After making your rug, stick around to find simple recipes, simple nutrition and simple ways to natural health.
For this rug, which is about 40 inches in diameter, I made approximately 150-175 pom poms. I actually did not do a final count, but there were a lot.
Disclaimer: This post contains affiliate links.
How to make the pom poms
At first, my niece walked me through the steps on how to make one. It involved creating something to wrap the yarn around, and then measuring out yarn. I then looked online for examples on how to make the contraption. Then, I came across the Clover pom pom maker. This is an absolute MUST HAVE if you plan on making a pom pom rug. Do not bother with a homemade contraption. The pom pom maker will save you a ton of time.
I thought for this price, and knowing how many I was going to make, it was worth it. Plus I got free shipping with Amazon Prime. There is a video here that shows you how to use it.
The rug backing
Once I had made all the pom poms, I needed some backing. I chose a rug cushion because it had holes that I could tie the pom poms to and it was non-slip. Big mistake! I would not recommend using this. It is very floppy and has no stiffness, therefore whenever I move the rug, all the pom poms shift. If I did it again I would get a normal rug backing.
1. I folded my cushion into quarters.
2. I cut a quarter circle.
3. Once opened, I had a pretty even circle.
4. I began to attach the pom poms.
Assembling the rug
I fed the piece of yarn that tied the pom pom through the holes. I then would feed another pom pom yarn through and tie those together. In order to make the pom poms very compact, I would tie them across to other pom poms a few inches away. So the back of the rug has tons of criss-cross tied yarn. Maybe not the best way, but it worked.
 |
| This shows how tightly smooshed together they were. |
All-in-all, I am very happy with the result. Although not perfect. I think it is adorable. When you sit or step on it, it is so soft and cozy. It is like being on a bunch of little pillows. I cannot wait til little one starts using it.
This is the perfect rug to slow down, enjoy the moment & simplify.
Are you craving a simple life?
On instagram I am creating a community to inspire your #wellbeing through #simpleliving #slowliving & #zerowasteliving.
I would love for you to join me.


Social Icons